Shelf Layering: Building Depth From Back to Front
How to give a flat-looking shelf depth with three layers: a backdrop, a middle band of books and objects, and one small piece in front, with a worked example.
At a glance
- Difficulty
- Easy
- Time
- About 15 to 30 minutes per shelf
- Best for
- Shelves that look flat or lined up
- Shelf type
- Deeper freestanding bookcases and built-ins
What you need
- A leaning frame, tray or large plate for the back
- A short row or stack of books
- One medium vase or main object
- One small low piece such as a bowl
- A plant in a cachepot
A shelf can hold lovely things and still look dull if they all stand in one line, shoulder to shoulder, like items laid out for inspection. The cause is almost always the same: everything sits at the same distance from the front edge, so the shelf has width and height but no depth.
Shelf layering is the fix. It means arranging a shelf in three loose bands from back to front and letting them overlap, so the eye moves into the shelf as well as along it. It needs no new objects, only a different way of placing the ones you have.
The three layers
Back layer: the backdrop
The back layer is flat, fairly tall and leans or stands against the rear of the shelf. Its job is to give the pieces in front something to be seen against. Good candidates are:
- a framed print or photograph, leaning;
- a tray stood on its edge;
- a large plate or platter on a plate stand;
- a flat woven basket or basket lid.
One backdrop per shelf is enough, and not every shelf needs one. For choosing a frame that suits the height of the opening, see the guide to frames and art on bookshelves.
Middle layer: the main event
This is where most things live: a row or a stack of books, a vase, the largest object on the shelf. The middle layer carries the color and the bulk. Stand it a little forward of the backdrop and partly in front of it, never neatly beside it.
Front layer: the small finish
The front layer is one small, low piece: a little bowl, a smooth stone, a tiny lidded pot. Place it slightly off-center and a little ahead of the middle layer. It should be the smallest thing on the shelf, and one is plenty. Two or three small items at the front bring back the lined-up look you were trying to lose.
How to build a layered shelf
- Clear the shelf and pick five or six pieces of clearly different heights.
- Place the backdrop off to one side, not in the center, leaning against the back.
- Add the books so that they cover the lower part of the backdrop or one of its edges.
- Stand the main object where the backdrop is not, overlapping the end of the books a little.
- Set the small piece in front, near the gap between two taller things.
- Step back and check that part of every layer is visible.
If you are working through a whole unit, do this after the books are in place, as described in the step-by-step guide to styling a bookshelf.
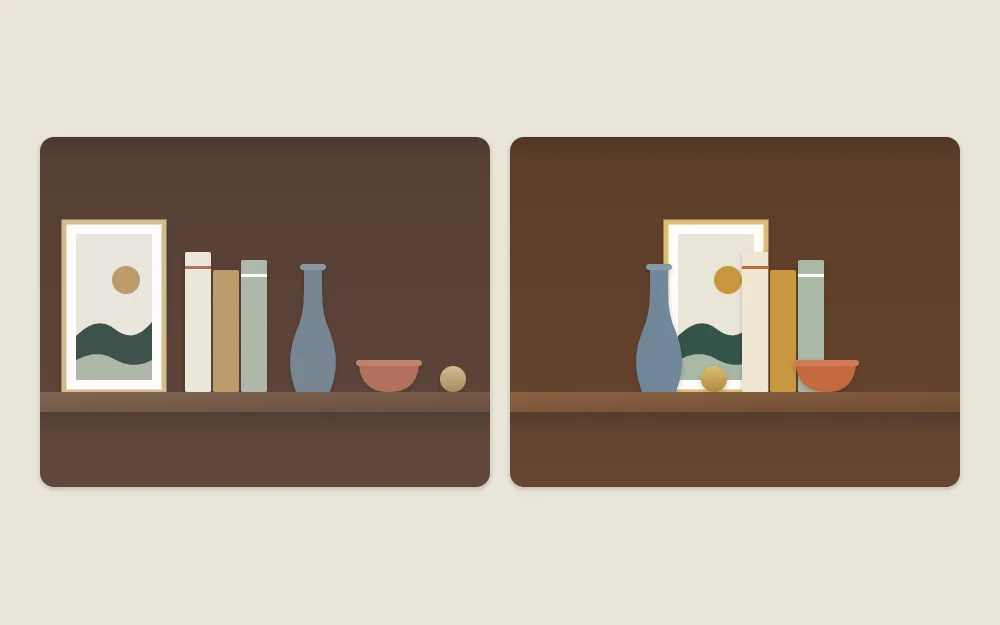
Overlap on purpose
Overlap is what turns three bands into one picture. When the corner of a frame disappears behind a vase, the eye understands that one is behind the other and the shelf gains depth. When the same two things stand apart with a neat gap, they flatten into a row again.
Aim to hide a modest part of the thing behind, about a quarter to a third as a loose guide. Cover more than half and the back piece is wasted. Overlap edges and corners, and keep the center of a picture clear so it still makes sense.
Step the heights down toward the front
Layers only work if you can see each one. The simple pattern is tallest at the back, mid-height in the middle and lowest at the front, like rows of seats in a theater.
Check the middle layer against the backdrop in particular. Books standing as tall as the frame behind them hide it entirely; a flat stack or a row of shorter books lets the top half show. A vase in the middle layer can rise above the backdrop, as long as it stands to one side of it. The guide to styling vases and bowls on shelves has more on matching a vessel to the height available.
Let shelf depth set the limit
Three layers need room. On a deep shelf there is space for a frame, a row of books and a bowl in front of the books. On a shallow one, books alone may reach almost to the front edge.
- Deep shelves: use all three layers on some shelves, two on others.
- Shallow shelves: use two layers. Lean a frame behind a low object, or set a small piece in front of a short stack, but not both.
- Very shallow ledges: overlap flat things only, such as two frames of different sizes.
Nothing should hang over the front edge or have to be squeezed in to fit. If it does, that shelf has one layer too many.
Keep some fronts clear
Layering every shelf to the same degree makes a bookcase look busy. On about a third of the shelves, leave the front band empty and let a simple row of books or a single object stand alone. The quieter shelves make the layered ones look richer, and they give you an easy place to pull a book from.
Good to know
Keep glass, ceramics and anything else breakable away from the front edge, especially on shelves at elbow height or within reach of children and pets. Give the front layer to pieces that would survive a knock, and make sure a leaning frame rests firmly against the back of the shelf, with an object in front of its lower edge to stop it sliding.
A worked example, shelf by shelf
Picture a bookcase with four deep shelves.
- Top shelf, two layers. A row of pale books on the left, with a trailing plant in a cachepot in front of the open space on the right.
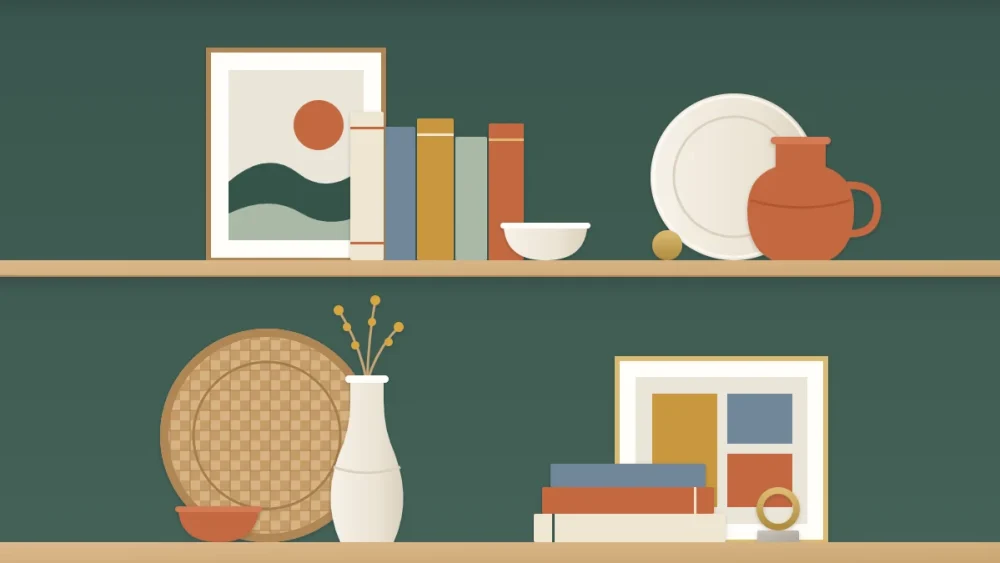
- Second shelf, three layers. A framed print leaning at the back right, a flat stack of books overlapping its left edge, a small bowl at the front.
- Third shelf, one layer. A full row of books, front left clear. This is the resting shelf.
- Bottom shelf, three layers. A round woven tray standing at the back left, a large jug overlapping it, and a low stack of oversized books to the right with a stone on top.
The backdrops sit on opposite sides, the layered shelves are separated by a plain one, and no two shelves repeat the same recipe.
Frequently asked questions
What is shelf layering?
It is arranging a shelf in bands from back to front instead of in a single line. A flat piece such as a leaning frame goes at the back, books and the main object sit in the middle, and one small low piece goes in front, with the edges overlapping slightly.
Can I layer a shallow shelf?
Yes, with two layers instead of three. Lean a frame or a tray at the back and place one low object in front of it, or set a small piece in front of a short stack of books. Nothing should overhang the front edge or need squeezing in.
How much should objects overlap on a shelf?
A modest amount, about a quarter to a third of the piece behind as a loose guide. That is enough for the eye to read one thing as sitting behind another. If more than half is covered, the back piece disappears and no longer earns its space.